Complete Guide: Ambilight Clone with Raspberry Pi 2, Arduino Nano, and WS2812b
Want to add dynamic RGB backlighting to your LED TV that changes color to match what's on screen? After a few days of building and testing, here's the complete guide — what RGB diodes and software to choose, and how to solve all the traps along the way.
The Idea
Add an LED RGB strip behind your LED TV that changes colors according to the video your Raspberry Pi is playing. Why? Because you can — and it's much easier on your eyes at night.
Software: Choosing the Right OS
XBMC (now called Kodi) is the multimedia player at the heart of this setup. For Raspberry Pi, choose a distribution that comes with XBMC preinstalled:
- Raspbmc — Stable, all plugins work, but the project was closing down at the time
- OSMC (Open Source Media Center) — Inherits Raspbmc, boots fast, fresh look. No Boblight support but will support Hyperion
- OpenElec (RECOMMENDED) — Very stable, supports both Boblight and Hyperion. Get the image from openelec.tv
LED Backlight Software: Boblight vs Hyperion
Two major options: Boblight or Hyperion.
Boblight
Boblight uses a daemon (boblightd) and an XBMC plugin as client. The plugin grabs edge pixels and sends data to the daemon, which drives your Arduino. The drawback: high CPU impact and noticeable lag.
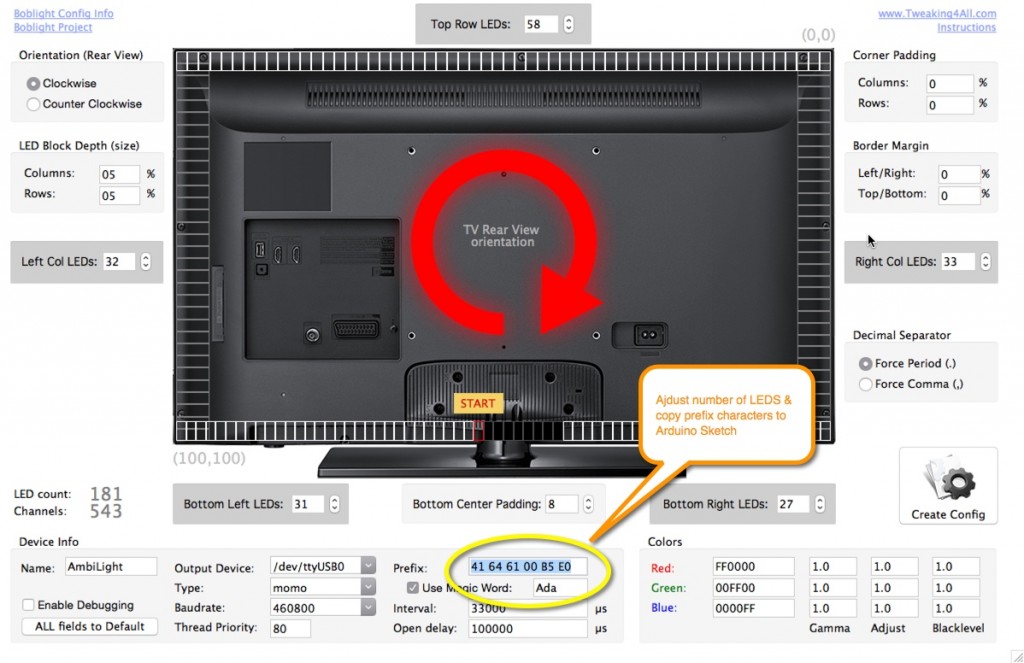
Hans from tweaking4all.com wrote an excellent guide and a configuration utility for Boblight that can also help calculate initial prefix bytes for Arduino.
Why Hyperion Wins
- Fast — Almost no delay (compared to ~1 second lag with Boblight)
- Priority channels — While watching video, use a mobile app to override colors or play effects
- iOS mobile app included
Installing Hyperion
SSH into your OpenElec box (enable SSH in System > Settings > Services; username root, password openelec) and run:
curl -L --output install_hyperion.sh --get https://raw.githubusercontent.com/tvdzwan/hyperion/master/bin/install_hyperion.sh
sh ./install_hyperion.sh
LED Placement
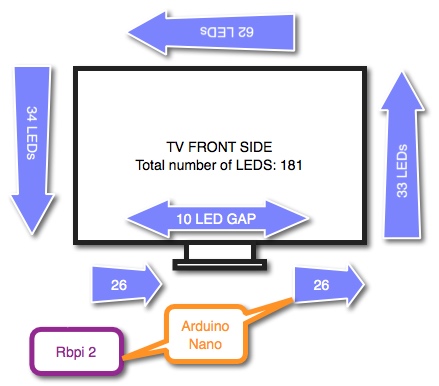
Plan your LED strip layout carefully. Note the direction of the strip, count LEDs on each side (top, bottom, left, right), and account for any gap at the bottom.
Hyperion Configuration
The Hyperion config is a JSON file. Use the Java-based configurator utility to generate your initial config, then upload it via SCP or paste it into the shell and fine-tune with nano.
Troubleshooting Hyperion
Check if Hyperion is running:
ps -a | grep hyperKill and restart:
killall hyperiond
/storage/hyperion/bin/hyperiond.sh /storage/.config/hyperion.config.json </dev/null >/dev/null 2>&1 &
Debug mode (see all messages):
/storage/hyperion/bin/hyperiond.sh /storage/.config/hyperion.config.jsonTest with solid color or rainbow effect:
/storage/hyperion/bin/hyperion-remote.sh --priority 50 --color red --duration 5000
/storage/hyperion/bin/hyperion-remote.sh --effect "Rainbow swirl fast" --duration 3000
Edit configuration:
nano /storage/.config/hyperion.config.jsonRemember to kill and restart Hyperion after config changes.
Hardware
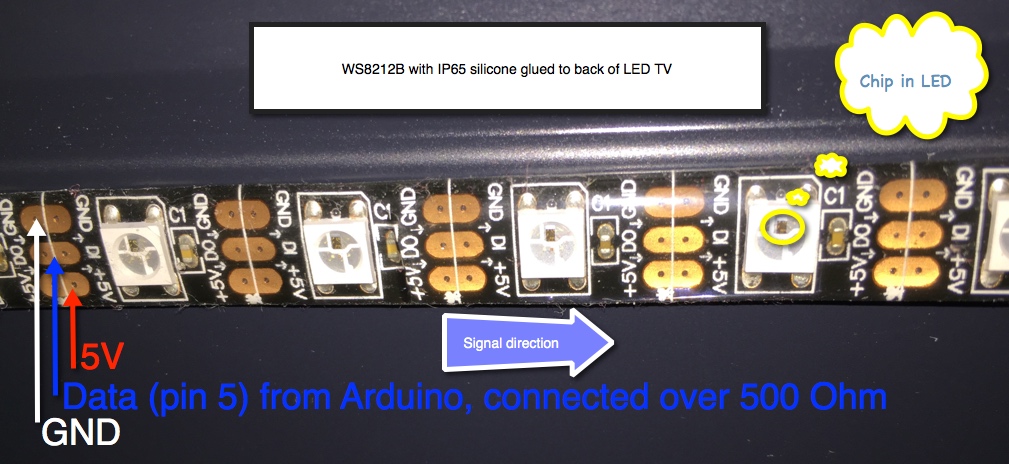
Choosing RGB LEDs: WS2812b IP65
Go for WS2812b IP65 with 3M stick tape, 60 LEDs/m.
Advantages:
- Only 3 wires: +5V, GND, and DATA
- WS2812 has the chip integrated in the 5050 RGB diode
- WS2812b has reverse voltage protection (easy to mix wires and kill the strip without it)
- IP65 silicone coating protects from dust
- 3M tape lets you stick directly to the TV
- 60 LED/m provides optimal brightness
Drawbacks:
- Cannot be driven directly from Raspberry Pi — needs Arduino because the 800kHz signal requires real-time timing that a Linux OS can't guarantee
- Expensive — about $12/m (March 2015)
- Power hungry — 5m × 60 LEDs = 300 LEDs × 3 colors × 20mA = 18A at 5V = 90W max. A 10A 5V PSU is enough in practice (measured 3-5A during use)
Player Hardware
Raspberry Pi 2 — More memory, 6× faster CPU than Pi 1. Banana Pi/Pro had problems with hardware video acceleration.
Arduino: Any Model Works
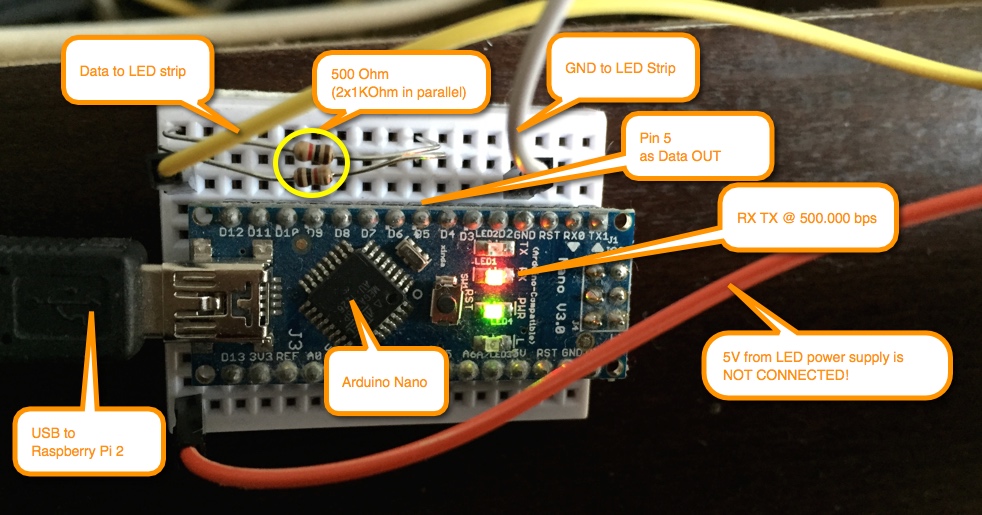
Use whatever you have, or order a cheap Arduino Nano. Connect via USB (not serial GPIO pins) to avoid 5V/3.3V logic level issues.
Detecting the Arduino:
ls -al /dev/tty*Look for /dev/ttyUSB0 (Nano) or /dev/ttyACM0 (Mega). If missing, replug the USB cable and check dmesg.
Serial Speed: Use 500,000 baud
Standard speeds like 115200 or 230400 cause connection drops. 500000 baud works because it's a multiple of the CPU frequency — no lost clock cycles.
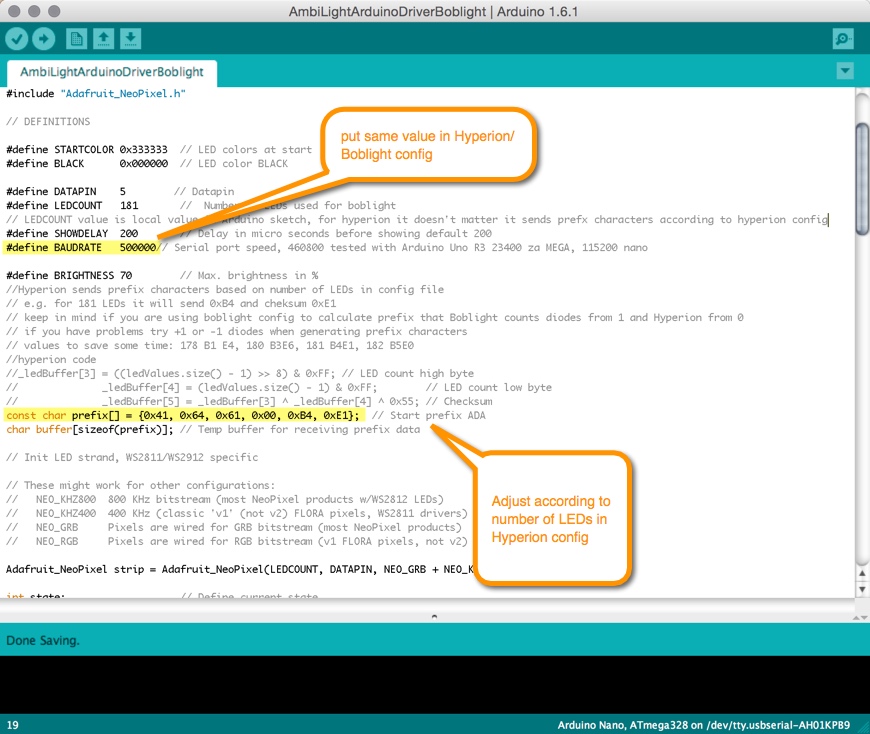
The Arduino Adalight Sketch
The Arduino simulates an "Adalight" device. Key configuration:
#include "Adafruit_NeoPixel.h"

#define STARTCOLOR 0x333333
#define BLACK      0x000000
#define DATAPIN    5          // Data output pin
#define LEDCOUNT   181        // Number of LEDs
#define SHOWDELAY  200        // Delay in microseconds
#define BAUDRATE   500000     // Must match Hyperion config
#define BRIGHTNESS 70         // Max brightness in %

// ADA prefix — last two bytes depend on LED count!
const char prefix[] = {0x41, 0x64, 0x61, 0x00, 0xB4, 0xE1};
char buffer[sizeof(prefix)];
Critical: the ADA prefix bytes. Looking at Hyperion's Adalight device code:
_ledBuffer[3] = ((ledValues.size() - 1) >> 8) & 0xFF; // LED count high byte
_ledBuffer[4] = (ledValues.size() - 1) & 0xFF;         // LED count low byte
_ledBuffer[5] = _ledBuffer[3] ^ _ledBuffer[4] ^ 0x55;  // Checksum
The last two prefix bytes (0xB4, 0xE1 in this example) must match your LED count. Get them wrong and nothing works.
Wiring: Arduino to LED Strip
- Connect Arduino pin 5 → 480 Ohm resistor → LED strip DATA IN
- Connect Arduino GND → LED strip GND
- Do NOT connect Arduino 5V to LED strip 5V — keep power supplies separate
- The resistor balances impedance to prevent signal reflections at 800kHz
Common Problems
LEDs light up on USB plug but Hyperion doesn't control them: Set the same baud rate in both Hyperion config and Arduino sketch. Verify the ADA prefix bytes match your LED count.
Hyperion runs but LEDs don't match the video: Hyperion needs to communicate with Kodi on port 9090. Check with:
netstat -lnp | grep tcp | grep 9090Also enable in Kodi: System > Settings > Services > UPnP > Allow control of Kodi via UPnP.
Future Upgrade
Add a USB video grabber (composite or HDMI) to capture signal from external devices like Apple TV or PlayStation while they play through your TV.
This is an archived maker project from 2015. Interested in what we're building now?
- New to AI? Start with What Is an LLM and How to Deploy It
- Building AI products? Read Edge AI to Custom LLMs
- Business owner? See How AI Assistants Work for Your Business
- Ready to explore? Check how we build custom AI solutions