
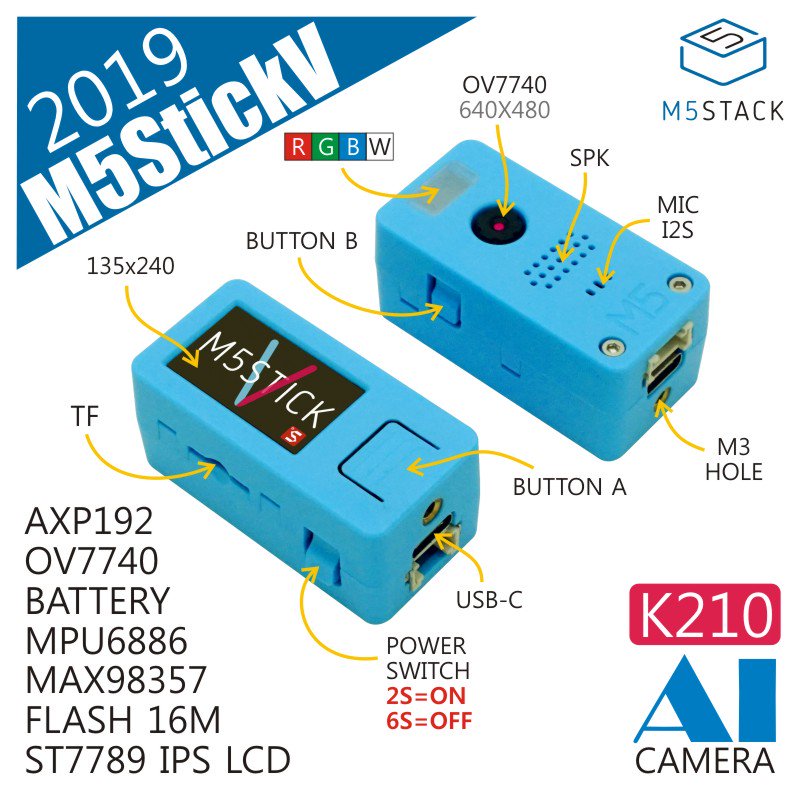
A $20 AI Camera in 2019
In August 2019, M5Stack shipped the M5StickV — a thumb-sized device built around the Kendryte K210 system-on-chip. For under $20, you got:
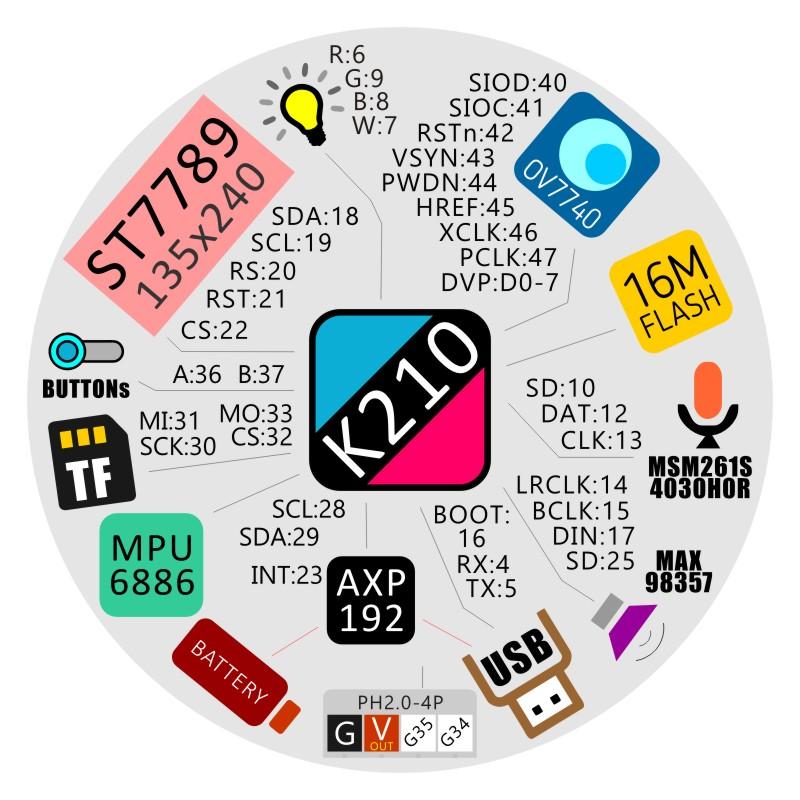
- Dual-core 64-bit RISC-V CPU at 400 MHz
- 8 MiB SRAM
- Hardware neural network accelerator (KPU)
- 0.8 TOPS peak performance
- OV7740 camera (VGA @ 30fps)
- 1.14" IPS display
- MicroSD, microphone, gyroscope, speaker, battery
This tiny device could run real-time face detection, object classification, and QR code scanning — entirely on-chip, with no cloud connection. It was one of the first widely accessible edge AI platforms that hobbyists and engineers could actually buy and program.
What the K210 Could Do
The spec sheet reads like a checklist of computer vision fundamentals:
- Face recognition and detection — identify known faces in real-time
- Object detection and classification — recognize shapes and types at 30fps
- Size and coordinate tracking — locate targets with bounding boxes
- Audio processing — microphone array beamforming and voice wake-up
- Speech recognition — on-device, no cloud dependency
For embedded engineers coming from Arduino and ESP32 territory, this was a quantum leap. The ESP32 could blink LEDs and read sensors. The K210 could see and hear.
Running MicroPython on the K210
Getting started was remarkably accessible. The M5StickV supported MicroPython through Sipeed's MaixPy framework:
import sensor
import image
import lcd

lcd.init()
sensor.reset()
sensor.set_pixformat(sensor.RGB565)
sensor.set_framesize(sensor.QVGA)
sensor.run(1)

while True:
    img = sensor.snapshot()
    res = img.find_qrcodes()
    if len(res) > 0:
        img.draw_string(40, 50, res[0].payload(), (236, 36, 36), scale=1.5)
        img.draw_rectangle(res[0].rect(), (236, 36, 36))
    lcd.display(img)
Twenty lines of Python for a real-time QR code scanner with on-screen overlay. The firmware could be compiled from source and flashed via USB — even on ARM-based hosts like the Nvidia Jetson Nano.
The Gap Between Edge AI and Real Intelligence
The K210 was impressive for its size and price, but it had hard limits:
| Capability | K210 (2019) | Modern LLM (2026) |
|---|---|---|
| Parameters | ~1-5 million | 8 billion |
| Memory | 8 MiB SRAM | 24 GB VRAM |
| Tasks | Classification, detection | Reasoning, conversation, generation |
| Training data | Thousands of images | Trillions of text tokens |
| Output | "This is a face" / "This is a cat" | Natural language responses, recommendations, analysis |
| Customization | Retrain classification model | Fine-tune with LoRA in 5 hours |
Edge AI answered "what is this?" — but it couldn't answer "what should I buy?" or "how does this compare to that?" or "find me something for a dinner party under €50."
That required a fundamentally different architecture: large language models.
The Bridge: From Vision to Language
The path from K210-style edge AI to modern LLM assistants followed three key developments:
1. Transformer Architecture Scaled Up
The attention mechanism that powers both image classification and language models is the same fundamental idea. The K210's neural network accelerator ran small convolutional models. Modern GPUs run the same attention patterns at billions of parameters, enabling understanding rather than just classifying.
2. Open-Source Models Became Competitive
In 2019, if you wanted a capable language model, you needed OpenAI's API. By 2025, open-source models — Qwen, Llama, Mistral — matched or exceeded GPT-3.5 quality while running on a single consumer GPU. This is the equivalent of the K210 moment for language AI: capable models, affordable hardware, open ecosystem.
3. Fine-Tuning Became Practical
LoRA (Low-Rank Adaptation) did for LLMs what transfer learning did for image classification. Instead of training from scratch, you add a small adapter (~130 MB) that teaches the model your domain. Training costs dropped from millions of dollars to under $1 per run.
Where We Are Now
At ai.rs, we took the same hands-on approach that drove the maker community around devices like the K210 and applied it to large language models:
| What We Did Then | What We Do Now |
|---|---|
| Flash MicroPython firmware via USB | Fine-tune Qwen/Llama with LoRA |
| Train face detection on custom datasets | Train product Q&A on 26,000+ samples |
| Deploy on $20 RISC-V chips | Deploy on dedicated GPU servers |
| Real-time camera inference | Real-time conversational AI |
| Read QR codes and detect objects | Understand natural language, recommend products, handle support |
The spirit is identical: take capable open-source hardware and software, customize it for a specific use case, and deploy it where it creates real value.
From Hobbyist to Production
The K210 was a hobbyist device. Modern AI assistants are production systems serving real customers 24/7. The difference isn't just scale — it's the full stack around the model:
- RAG (Retrieval-Augmented Generation) — Real-time product database access, so the model always has current prices and availability
- Safety training — 275+ edge-case samples that prevent hallucination, off-topic responses, and prompt injection
- Monitoring and iteration — Every conversation logged, weak spots identified, training data improved continuously
- Multi-language support — One model serving 6+ languages natively
But the core insight from the maker era still holds: you don't need a research lab to build useful AI. The K210 proved that computer vision could run on a $20 chip. Open-source LLMs prove that conversational AI can run on a single GPU.
Getting Started
If the maker spirit of the K210 era resonates with you, here's how to start with modern LLMs:
- Try it — Run Ollama with Qwen3-8B on any machine with a GPU
- Customize it — Prepare 5,000+ training samples from your domain data
- Fine-tune it — Use Unsloth + LoRA for a 5-hour, sub-$1 training run
- Deploy it — Serve it on dedicated hardware with RAG for real-time data access
Or if you'd rather skip the infrastructure work: see how we build custom AI assistants — from your product data to a live AI that knows your business.
This article is based on our original 2019 coverage of the M5StickV and Kendryte K210 platform. The maker community around edge AI devices like the K210, ESP32, and Raspberry Pi laid the groundwork for today's accessible AI deployment ecosystem.